After three years, recognizing the evolving landscape of data engineering tools and the ongoing relevance of this project, I’ve made several updates to Practical Data Engineering. Key changes include updating components like Dagster and Delta Lake, removing Spark in favor of using Delta-rs directly, to streamline local development and simplify the architecture. For those interested in the original architecture, the v1 branch preserves the initial setup.
I also added a quick YouTube Video that shows you how to install and run.
This post focuses on practical data pipelines with examples from web-scraping real-estates, uploading them to S3 with MinIO, Spark and Delta Lake, adding some Data Science magic with Jupyter Notebooks, ingesting into Data Warehouse Apache Druid, visualising dashboards with Superset and managing everything with Dagster.
The goal is to touch on the common data engineering challenges and using promising new technologies, tools or frameworks, which most of them I wrote about in Business Intelligence meets Data Engineering with Emerging Technologies. As well everything runs on Kubernetes in a scalable fashion but as well locally with Kubernetes on Docker Desktop.
The source-code you can find on practical-data-engineering for the data pipeline or in data-engineering-devops with all it’s details to set things up. Although not all is finished, you can observe the current status of the project on real-estate-project.
What are we building, and why?
A data application that will collect real-estates coupled with Google maps way calculation but potential other macro or microeconomics like taxes, the population of city, schools, public transportation. Enriched with machine learning correlations to know factors that influence the price the most.
Why this project? When I started in 2018, I wanted to find the next best flat to rent but there was no sophisticated real-estate-portal out there in Switzerland. I found this very entertaining post about Datamining a Flat in Munich and wanted to code my own. Presently there are tons of services like PriceHubble in Switzerland or Zillow in the US, but still, it’s worthwhile to optimise for finding your dream apartment or house. On top of it, it is a genuine example that includes enough data engineering challenges.
Starting with web scraping gives you the power to treat every website as a database. We download the latest properties or those who have changed with a change data capture (CDC) mechanism. Zipping and uploading them to S3. With a Delta Lake table, we merge new changes with schema evolution. From there we add some machine learning and data science magic with Jupyter notebooks. Ingest it into the Druid data warehouse. Presenting the data in a business intelligence dashboarding manner. All of it is tied together with a well-suited orchestrator. And of course, everything is running cloud-agnostic anywhere, with Kubernetes. A gist of how the pipeline will look like as of today you see below.

💡 What will you learn?
Below I noted the key learnings which are integrated into a full-fledged data engineering project to illustrate the how part in the most hands-on way. Hopefully, you’ll find something interesting for you!
- Scraping with Beautiful Soup: How to get value out from a website with basic Python skills.
- Change Data Capture (CDC) with Scraping: Using a fingerprint to verify against the data lake if a property needs to be downloaded or not.
- How to use an S3-Gateway / Object Storage: Placing an S3 API in front of your object storage in the so-called “gateway-mode” to stay cloud-agnostic. This allows you to change the object-store from Amazon S3 to Azure blob storage or Google cloud storage with ease.
- UPSERTs and ACID Transactions: Besides schema evolution mentioned above, Delta Lake also provides merge, update and delete directly on your distributed files.
- Automatic Schema Evolution: With the growing popularity of data lakes and ELT, data engineers are left with lots of data but no schemas. To integrate schema and especially schema changes, automatic schema evolution is important.
- Integrating Jupyter Notebooks - the right way: Notebooks hold important data transformations, calculations or machine learning models yet it’s always hard to copy the living code in your data pipelines. We will integrate notebooks as a step of our pipeline with Dagster.
- Learning about Apache Druid: Druid is one of the fastest Data Warehouse / OLAP Solutions. It’s optimized for fast real-time ingestion and immutable data. On the downside, it’s hard to set up, luckily, below you see how to do exactly that.
- Open-Source dashboarding with Apache Superset: How to use Superset with its many out-of-box connections. On top, it’s free of charge compared to Tableau, Looker and others.
- DevOps with Kubernetes: How to run Kubernetes locally and install all of the tools here. If you haven’t used Kubernetes, don’t worry, examples and local set-up with Kubernetes for Docker are included.
- Introduction to features of Dagster: Showing how all of the data engineering parts can be tided together with one open-sourced tool called Dagster (alternative to Airflow).
- And many more which I won’t mention but you’ll hopefully see along the way.
Hands-On with Tech, Tools and Frameworks
In an earlier post about Open-Source Data Warehousing, I focused explicitly on Apache Druid, Airflow and Superset. This post is all about using data engineering in a practical example. To give you an overview of what we use, I extended the tech, tools and frameworks I used in these blog post on top of the newer Databricks Lakehouse Paradigm.

Below you’ll find different chapters for different topics. I included at least one practical example with some hands-on code but kept it minimalistic as the source code is all open in the above-mentioned repositories. Some chapters include extra information or architectural reasoning of why I believed a certain tool or method is especially suited for the use-case. But let’s get started with scraping data implemented with Python.
Getting the Data – Scraping
The internet has an infinite amount of information, that’s why scraping is valuable to know even though less know for data engineers. As a first step, we are getting the properties from a real-estate portal. In my case, I chose a Swiss portal, but you can choose anyone from your country. There are two main Python libraries to achieve this, Scrapy and BeautifulSoup. I used the latter for its simplicity.
My initial goal was to scrape some properties from the web-page by determining how many search page result I get and scrape through each property from each page. While testing around with BeautifulSoup and IPython — IPython is an excellent way to initially test your code — and asking my way through StackOverflow. I found that certain websites provide open APIs which you find in the documentation of their website or with the interactive developer tools (F12) explained below. This will save you from scraping everything manually and therefore also producing less traffic on the site of the provider.
If you want to check if another website has an open API, you can search for an HTTP request by simply clicking F12 and switching to the network tab to check requests that your browser send when clicking on a property.
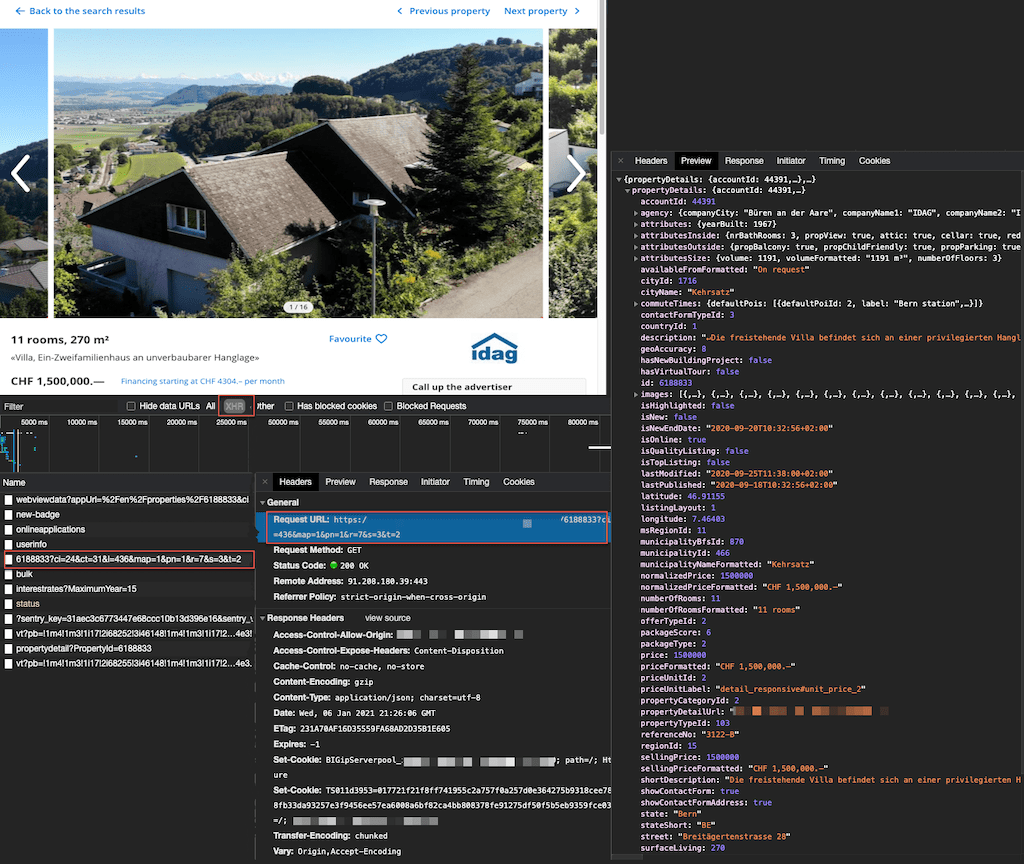
To get started with web-scraping, it helps when you know some basic HTML. To get an overview of the site you would like to scrape your data from, use the above interactive developer tools. You can now inspect in which <table>, <div> or id, class or href your information is found. Most websites with valuable data have ever-changing id’s or classes, which makes it a bit harder to just grab the specific data you need.
Let’s say we want to buy a house in Bern, the capital of Switzerland. We can e.g. use this URL with this search term: https://www.immoscout24.ch/en/house/buy/city-bern?r=7&map=1. R, in this case, is the radius around Bern and map=1 mean we only want properties with a price tag. As mentioned we need to find out how many pages of result we have. We can see this information is at the very bottom. A hacky example that worked for me is I searched all buttons on the page and chose the one smaller and equal three which equals me as the last page number two as of today. An example code to scrape how many pages of search results we have:
|
|
To get to a list of property IDs I assembled a search-link for each search where I grabbed links that stared with “en/d” and had a number in it. Some sample code below:
|
|
Complete code above you can find on GitHub on solids_scraping.py in functions called list_props_immo24 and cache_properies_from_rest_api.
Storing on S3-MinIO
With an object storage, you provide one single API without lock you in into a cloud vendor and you can always access the same URL/API within your application or pipelines. I use MinIO but there are several others. They normally run on Kubernetes, are open-source and may also boost performance. Plus if you haven't access to your own S3 e.g. locally or on your servers, you can simply create one in three lines of code:
You can access the endpoint
1
2
3
4
5
6
7
8
9
wget https://dl.min.io/server/minio/release/linux-amd64/minio
chmod +x minio
./minio server /data
# — Output —
Endpoint: http://192.168.2.128:9000 http://127.0.0.1:9000
AccessKey: your-key
SecretKey: your-secret
Browser Access:
http://192.168.2.128:9000 http://127.0.0.1:9000
127.0.0.1:9000 programmatically with its key/secrets. On top, you get a full-blown UI as you can see below.

Change Data Capture (CDC)
CDC is a powerful tool and especially in cloud environments with event-driven architectures. I used it to minimize the downloads of already downloaded properties. Besides existing open-source CDC solutions like Debezium, I implemented my own simple logic to detect the changes. Also because I have no access to the source-OLTP database where the properties are stored which you'd need.
I accomplish the CDC by creating two functions. The first one lists all properties to certain search criteria and the second one compares these properties with existing once. How am I doing that? Primarily, I create a fingerprint from each property that will tell me if the one is new or already exstinging. You might ask why I'm not using the unique property-ID? The reasons are I didn't just want to check if I have the property or not. As mentioned in the intro I also wanted to check if the seller lowered the price over time to be able to notify when the seller can't get rid of his house or flat. My fingerprint combines the property-ID and the selling price (called normalized_pricein my data). One more benefit if more columns getting relevant, I could just add them to the fingerprint and my CDC mechanism would be extended without changing any other code.
To have the relevant selling price for each property-ID I will scrape them separately from the website same as the IDs themselves. You can check that code in solid_scraping.py. The function is called list_props_immo24 which returns all properties as a data frame for my search criteria.
The logic for CDC happens in get_changed_or_new_properties in solids_spark_delta.py where I compare the existing once in my delta table with the new coming from list function above. As Delta Lake supports an SQL-API I can use plain SQL to compare the two with this simple SELECT-Statement:
|
|
Adding Database features to S3 – Delta Lake & Spark
To get database alike features on top of your S3 files, you simply need to create a Delta Lake table. For example, to add a dynamic schema to not break ingestions into a data lake or data pipelines downstream is quite a challenge. Delta is doing that and automatically add new columns incrementally in an optimistic concurrent way. As data in a data lake ist mostly distributed files, this is quite hard if you were to do that yourself. But as Delta already enforce schema and stores this information in the transaction log it makes sense to handle this with Delta. In my data sets with 60+ dynamic and changing columns, I made use of this feature extensively.
How to create or read a Delta table then? It can be easily done with providing the format delta opposed to parquet or other formats you'd know:
|
|
Another feature of Delta is the automatic snapshotting mechanism with time-travel that lets you check older versions of a table. This can become very handy for dimension-tables to protocol history e.g. addresses. This way you can skip a rather complex SCD2 logic. Just make sure to set your retention threshold high enough before you using vacuum (deletion of older data).
|
|
Also handy is it does not matter if you're reading from a stream or batch. Delta support both in a single API and target sink. You can see that well explained at Beyond Lambda: Introducing Delta Architecture or with some code examples. Often used MERGE-statement in SQL can be applied on your distributed files as well with Delta including schema evolution and ACID transaction:
|
|
Further motivation why I'm using Delta for my project:
- using SQL on top of my distributed files
- simply merge my new properties into my data lake, no need to manually identify data changes
- working with JSONs and each has a totally different schema, I don't need to worry about that with schema evolution
- I get a full-blown transaction log to see what went on
- everything is well compressed and in columnar format stored ready for analytics query with open-source Apache Parquet files
- I have rich APIs in different languages with Scala, Java, Python and SQL
- with deletes integrated I'm prepared for GDPR requirements
- I can always travel back in time to see how the selling price of my properties has risen over time
- no need to worry about size and speed as everything is scalable with Spark, even the metadata.
- future proof with unified batch and streaming source and sink - no need for a lambda architecture where batch and streaming is handled separately
- everything is open-source, the data format with Apache Parquet and Delta Lake itself
To add to the popularity of SQL, I added a Dagster generic solid that can pass any SQL statement along and it will use spark to run on top of my Delta Lake tables. The solid is called _sql_solid (original coming from Dagster airline-demo). The full integrated example in solids_spark_delta.py or below an extract of how I can pass along the merge within Dagster.
|
|
Machine Learning part – Jupyter Notebook
I'm not a data scientist, still, I wanted to have some insights and fun with my data as well. That's why initially copied one or two Notebook from Kaggle to play around with. In my project, I wanted to integrate them into my pipeline.

Why bother with Jupyter notebooks? Because you most probably have skilled people who are creating the most advanced notebooks with real insight from your data. But unfortunately, these notebooks need to run manually and are not integrated into the data pipelines. There are two options in my opinion. Either you can test and approve notebooks, integrate them into your pipeline, this is basically to copy your python code over into your pipelines. This obviously is a lot of work and does not support changes from the data scientists in the notebooks as these need to be copied over again. So what else could we do?
Good thing there is Papermill that lets you run jupyter notebooks directly. And even better, Dagster integrated Papermill into dagstmill which lets you place one notebook as part of your existing data pipeline. On top of that, you have visibility within Dagster's UI, which lets you open the notebook directly. As well you can interact with the input and output of the notebook or use the output further downstream in your pipeline.
My part of the integration, you can find in data_explorationin solid_jupyter.py.
Ingesting Data Warehouse for low latency – Apache Druid
Most business intelligence solutions include a fast responsive OLAP solution often done with cubes. For example, in Microsoft SQL Server you have Analysis Services. But what should you use if you want an open-source product which is able to handle big data with no problems? One excellent choice is Apache Druid, but if you want to know more details or find other ways for you, check out my blog post about OLAP, and what's next.
Druid is a beast to set up, but luckily in my data-engineering-devops infrastructure project, you find how to set it up on Kubernetes, or locally on your laptop with Docker Desktop which provides a native Kubernetes. Also, check out the original helm chart coming from Druid.
|
|
For the project part, I set it up and ingested some properties, but that was more to test the set-up locally. As speed is not a major requirement for me right now, and Druid eats a lot of resources and hard to run locally, I'm focusing on the Delta Lake to be the single source of thought for my queries.
The UI with Dashboards and more – Apache Superset

No project isn't complete without a nice UI that visualises your insights. For its open-source purposes and features, I use Apache Superset for some time now. Lately, Superset announces version 1.0 and it is among the top 200 projects on GitHub. The founder Maxime Beauchemin and his company Preset are building more and more amazing features, one being to create your own plugins easily.
Superset can easily connect to Druid natively, or it can query a data lake with Delta Lake tables, plus it can handle almost any kind of SQL based database. The dockerfile I use is the original with adding pydruidfor querying Druid. Functionalities as exploring, dashboarding views and how to investigate your data you see below:

Orchestrating everything together – Dagster
Ultimately, the part that glues everything together, the orchestrator. Today there is quite an extended list of orchestrator out there. I tried to highlight the most suitable alternatives to Apache Airflow and went with Dagster for the coming reasons below.
Data pipelines start simple and straight-forward, but often they end up vastly heterogeneous with various APIs, Spark, cloud data warehouse, and multi-cloud-providers. Above a real-live example from GoodEggs which includes mode, networkx, stitch, SQL, Jupyter-notebooks, Slack-connector, cronitor, and many more. This is a complex data pipeline but it is still fairly common to have such an amount of diverse technologies.
Why I'm saying all that? Because this is one place where Dagster shines. It's built with a high-level abstraction in mind, not just as an executor. Even more, you can use different executor e.g. Airflow, Celery, Dask or Dagster itself, no lock-in here. Dagster lets you focus on building your data pipelines. It is made for data-flows and with it to pass data between the solids (their name of tasks). The integration with modes lets you switch from dev to test and production with one click and different resources on each mode. Let's say you won't have a snowflake-db locally available, so you could just mock it or use a simple Postgres locally for testing but with no changing of your data-pipeline code.
You have an elegant way of separating business logic in solids and technical code within resources. Resources are also commonly available in solids and are written once. Meaning your Spark connect, your Snowflake create a table, your rest-call to a certain service, these all can be written once in a resource and all users have it available in every solid.
Dagster provides a beautiful feature-rich UI called Dagit. It includes state-of-the-art GraphQL Interfaces for fetching status, starting, stopping pipelines and many more. As shown in the machine learning part, it closes the boundaries to the machine learning team with the integration of Jupyter notebooks. It's all free and open-source and the team is extremely responsive on both Slack and GitHub.
What about testing? Testing data is very hard and nothing compared to software testing as data is and even tools and framework is dynamic and can change every output of your transformation, as well the size of data changes in dev, test, and production. Dagster's abstraction supports testing profoundly. Type checks and assertions about your data are included. But I'd suggest using the first-class integration of Great Expectation.
On top of that, Dagster embraces the functional programming paradigm. By simply writing Dagster pipelines, you are writing functional solids that are declarative, abstracted, idempotent, type-checked to catch errors early. Dagster also includes simple unit-testing and handy feature to make pipelines and solid testable and maintainable.
All of my examples are implemented with Dagster. Just clone my repo, install Dagster and start Dagit from src/pipelines/real-estate. I’m trying to build an awesome-dagster with common code-blocks as solids, resources and more to be re-used by everyone. Feel free to contribute if you have nice components to add.
DevOps engine – Kubernetes
And finally, the engine everything runs on locally and cloud-agnostic in the cloud is Kubernetes. Quoted from an earlier post in chapter Use a container-orchestration system:
Kubernetes has become the de-facto standard for your cloud-native apps to (auto-) scale-out and to deploy your open-source zoo fast, cloud-provider-independent. No lock-in here. You could use open-shift or OKD. With the latest version, they added the OperatorHub where you can install as of today 182 items with just a few clicks. […] Some more reasons for Kubernetes are the move from infrastructure as code towards infrastructure as data, specifically as YAML. […] Developers quickly write applications that run across multiple operating environments. Costs can be reduced by scaling down […]
To get hands-on with Kubernetes you can install Docker Desktop with Kubernetes included. All of my examples are build on top of it and run on any cloud as well as locally. For a more sophisticated set-up in terms of Apache Spark, I suggest reading the blog post from Data Mechanics about Setting up, Managing & Monitoring Spark on Kubernetes. If your more of a video guy, An introduction to Apache Spark on Kubernetes contains the same content but adds still even on top of it.
Conclusion
We have seen that in order to apply hands-on data engineering methodologies to a real-estate project, you need to know a good amount of the latest big data tools and frameworks. As well as data architecture to assess how these fit together and can be utilised for specific use-cases. I hope I could give you some inspiration and ways to create your own data engineering project. From scraping the web to storing the data in an S3 object store, adding database features onto it, using machine learning capabilities with Jupyter notebooks, ingesting it into a data warehouse, visualise the data with a nice dashboard, connecting everything together with an orchestrator and running it cloud-agnostic.
If you want to test your knowledge, start the Pokemon or Big Data quiz, you will see it’s not that easy 😉. If you like more Open-Source Data Engineering Projects, I curate a list I constantly update.
That’s it for now. If you like the content and want to follow along, make sure you subscribe to my newsletter, check my code on GitHub or visit me on LinkedIn, or Twitter for genuine news about the data ecosystem.
Republished on Medium.